Game Hacking: Extracting Meshes to Make a Minimap HUD
Extracting/ripping game meshes to create a minimap Heads Up Display (HUD) showing player position.
Introduction
I originally posted this on GuidedHacking and thought it would be nice to port the writeup to my blog. For context, this article works with the Maze game by LiveOverflow - more info can be found here
The Goal
I couldn’t find much about texture/mesh ripping on the forum so I decided to throw together a post that may help some people or spark some ideas. This was done with a Unity game, I would hope this process would work for other game engines as well.
This post is half tutorial, half case study from my personal experience extracting game textures from this MMO Maze game: Maze Players.
My goal was to rip game meshes/textures to create a mini HUD with my position in the maze, inspired by this video where liveoverflow discusses various people’s approach to his hacking challenges.
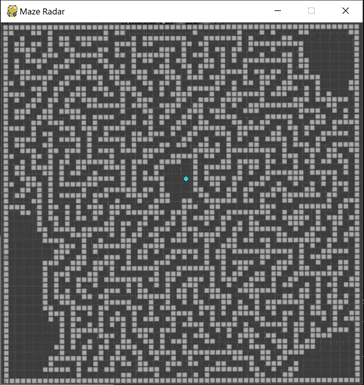
^ The goal: minimap HUD showing maze layout + player position.
Failed Attempts
Perhaps someone can provide clarity on a better way to do this, or maybe I was doing something wrong. After watching the video, I tried using Ninja Ripper. However, it functionally only dumps whatever is in the Draw Call buffer at the time (or whatever is rendered to the screen?) - meaning you’d have to run around the entire maze to rip everything piece by piece. I’m not sure what methodology the other person used to extract all game meshes using Ninja Ripper, but in my efforts I was not prepared to run around the entire maze ripping every 5 steps and I couldn’t find a way around it.
In any event, if you do proceed with Ninja Ripper, after ripping meshes you can install the NinjaRipper Blender plugin and import the .rip files to view the meshes in the 3d modeling software [Blender]. It looks like Blender 2.8 had some breaking changes and there are a few addons on the web, this is the NinjaRipper addon I used for Blender 2.83: xpawelsky/RipImport
This is the result of running around a bit and ripping textures a few times. As you can see, the result has quite a bit of detail but is also missing a lot.
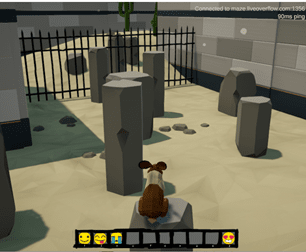
^ Actual Game
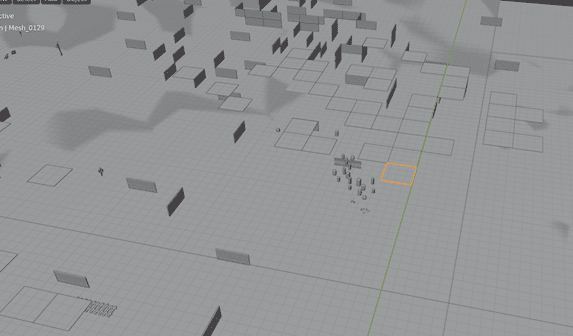
^ Blender w/ imported .rip files
I then tried ripping textures using another tool, uTinyRipper (mafaca/UtinyRipper). It failed. Building from source and debugging in Visual Studio I can see asset files picked up, however, it does not find a main game file and fails. I tried a few code changes to fix it but ultimately looked for another ripping tool.
AssetStudio
Enter AssetStudio (Perfare/AssetStudio).
Using this tool you can import the unity assets into AssetStudio using: “File > Load file” or “File > Load folder” – for this particular game, you’re looking in the Maze_Data directory with the ‘level’ files. In particular, level2.

After the assets are loaded, you should be able to see assets pertaining to each file. Since my goal was to extract the maze, I assumed “Maze” was a good place to start.
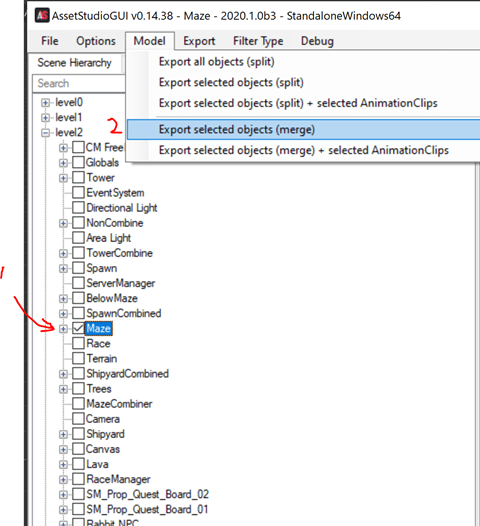
To extract the Maze files:
(1) Check Maze
(2) Model > Export selected objects (merge)
The result will be a .fbx file – this can be loaded into a 3d modeling tool such as Blender.
Now, of course here comes the curveball… import this extracted .fbx file into Blender and when your computer stops screaming you end up with this – essentially a set of Empty objects.
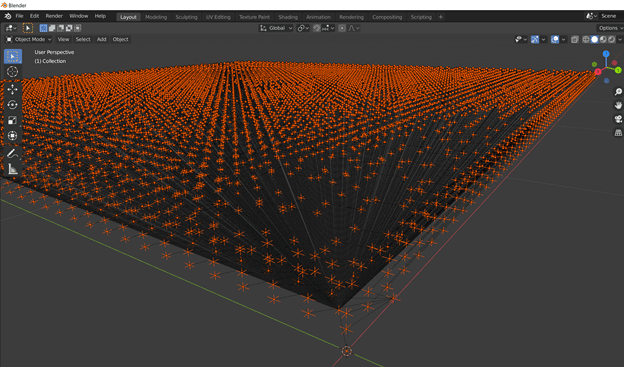
In Blender, an Empty object holds a few properties, the most important to us is are the x,y,z coordinates and the name of the empty object (based on the name, we know which .obj (mesh) this Empty object is associated with, to be explained shortly).
Now that we have extracted the framework of the maze, so we need to get the meshes as well to create a 3d rendition of the maze. Blender has a nice scripting engine, thus it’s rather trivial to enumerate over all objects and pull a unique set of meshes you need to export from AssetStudio and import into Blender. Alternatively, in AssetStudio you can look into the structure of Maze which we exported earlier and see the needed meshes.
I ended up with this list, there may have been more but this sufficed for me:
‘_Env_Ceiling_06’,
‘SM_Env_Wall_End_Coner_Outer_01’,
‘SM_Env_Wall_Interior_Ground_01’,
‘SM_Env_Wall_Interior_01’,
‘SM_Env_Wall_Quarter_01’,
‘SM_Env_Wall_Trim_Floor_01’
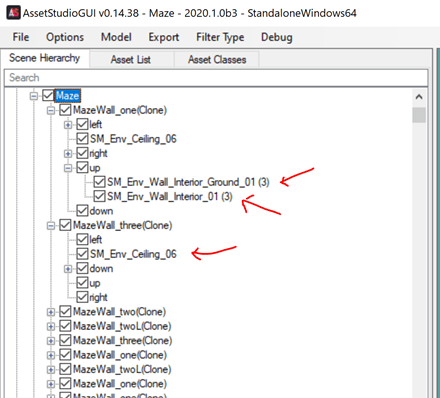
From here, we have a list of objects we need to export from AssetStudio.
(1) go to the Asset List
(2) search for the Mesh
(3) select the Mesh (make sure the Type = Mesh)
Then select ‘Export > Selected Assets’

Once the assets are exported, open Blender back up and import the Meshes: “File > Import > Wavefront (.obj)“
Putting It All Together
At this point, we should have everything we need. We have a wireframe with a set of Empty objects that all have x,y,z coordinates and by the name of each Empty we can associate the proper Mesh. We also have all the Meshes we need loaded into Blender as well to use as source objects for the copy. It’s a good time to save because if anything messes up you don’t want to wait to load the .fbx and .obj files again as this process can take a while.
The next step is to iterate over all Empty objects and copy the proper Mesh using the coordinates from the Empty object. Luckily, Blender has a handy python based scripting engine that makes this task enormously simpler than copying each wall by hand.
Here is my script, I have entered comments to give some clarity as to what is happening. I copy all new meshes into a new collection so they can be easily grouped and deleted if you want to modify the script and try again with a few modifications.
Blender Script - Copy Meshes to corresponding Empty coordinates:
import bpy
from mathutils import Vector


def parent_coords_recurs(obj):
        return (obj.location + parent_coords_recurs(obj.parent)) if hasattr(obj.parent, 'location') else obj.location

def dup_objects(src_obj, dest_objects, newScale):
    # for each empty
    for dest_obj in dest_objects:
        new_obj = src_obj.copy()
        new_obj.data = src_obj.data.copy()
        new_obj.animation_data_clear()
        new_obj.scale = Vector((newScale, newScale, newScale))

        # NOTE: the z/y coordinates are swapped. Without doing this, we build along the z axis for this particular game and the result is unusable (at first glance).
        # additionally, each Empty object has a set of parent objects with their own x,y,z coorinate offsets that are inherited by the current Empty object
        # thus, we recursively iterate through parent coordinates to get a final position offset
        new_location = parent_coords_recurs(dest_obj)
        new_obj.location = (new_location.x, new_location.z, new_location.y)

        newCollection.objects.link(new_obj)


# creates new collection to place copied Meshes
newCollection = bpy.data.collections.new("Collection - Maze")
bpy.context.scene.collection.children.link(newCollection)

# sets scale of new objects
newScale = 1

# list of imported Meshes: .obj
mesh_names = [
    'SM_Env_Ceiling_06',
    'SM_Env_Wall_End_Coner_Outer_01',
    'SM_Env_Wall_Interior_Ground_01',
    'SM_Env_Wall_Interior_01',
    'SM_Env_Wall_Quarter_01',
    'SM_Env_Wall_Trim_Floor_01'
]

# for each mesh
for mesh_name in mesh_names:
    ### source object to copy from (Meshes)
    # Mesh with mesh_name in it's name
    src_obj = list(filter(lambda x: (mesh_name in x.name and x.type == 'MESH'), bpy.data.objects))[0]

    ### destination objects (Empty objects) -- contain x,y,z coordinates to copy to
    # Empty objects with mesh_name in their name
    dest_objects = list(filter(lambda x: (mesh_name in x.name and x.type == 'EMPTY'), bpy.data.objects))

    dup_objects(src_obj, dest_objects, newScale)
And there you have it, we have placed each mesh at an offset and rebuilt the maze in Blender.
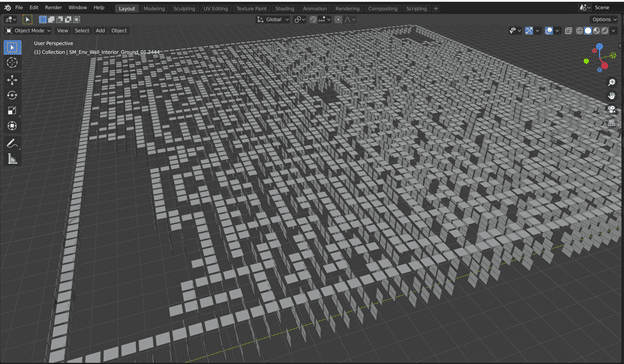
Success! Sort of…
The map looks a bit jacked up, almost like the objects of different types have shifted, however, an overhead view mimics what we see in the YouTube video and it’s beautiful – we have achieved our goal of extracting a map of the maze.
Change to Orthographic Projection and we should have a pretty nice screenshot.
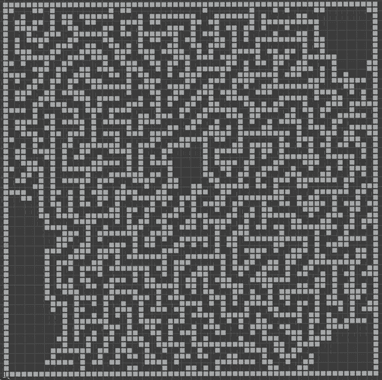
Take a screenshot or whatever to get the map. From here you can do the things (hook the game, plot your coordinates, etc.) to make this functional. The world is your oyster.
PS: I would recommend looking at a basic video of Blender shortcuts if you need to mess around with the game objects for this or another project, they are super helpful, save a lot of time, and in general make Blender much easier to get started with.